

Overview
The PowerConnect Java agent can be used to monitor SAP Cloud Connector. SAP Cloud Connector is a software component that provides a secure and seamless connection between on-premises systems and cloud-based applications and services. It acts as a link between the internal network of an organization and the SAP Cloud Platform.
The PowerConnect Java agent is able to collect various logs and metrics from SAP Cloud Connector environments for monitoring, security and troubleshooting use cases.
Installation
Linux
To install the PowerConnect Java Cloud Connector edition on a Linux environment perform the following steps:
-
Obtain the PowerConnect Java Cloud Connector package
-
Login to the target server where the Cloud Connector software is running
-
Copy the package to a temporary location on the target server e.g.
scp powerconnect-java-cloud-connector.jar targethost:/tmp -
Login to the target via SSH
ssh root@targethost -
Create a directory where the PowerConnect Java Cloud Connector software will be installed e.g.
mkdir /opt/powerconnect -
Copy the package to the target folder e.g.
cp /tmp/powerconnect-java-cloud-connector.jar /opt/powerconnect -
Make sure the folder and package are readable by the user that runs SAP Cloud Connector e.g.
chown -R <sapuser>:<sapgroup> /opt/powerconnect -
Follow the configuration steps below to configure the agent
Windows
To install the PowerConnect Java Cloud Connector edition on a Windows environment perform the following steps:
-
Obtain the PowerConnect Java Cloud Connector package
-
Login to the target server where the Cloud Connector software is running
-
Open the Command Prompt
-
Create a directory where the PowerConnect Java Cloud Connector software will be installed e.g.
mkdir e:\powerconnect -
Copy the package to the target folder e.g.
copy e:\tmp\powerconnect-java-cloud-connector.jar e:\powerconnect -
Follow the configuration steps below to configure the agent
Configuration
The Cloud Connector software is secured and does allow for the deployment of apps (i.e. war files). Therefore we need to use the Java Agent mechanism to load the agent with a configuration file.
The configuration file is a simple properties file which supports the following values:
|
Property Name |
Default Value |
Required |
Description |
|---|---|---|---|
|
sap_system_name |
SCC |
No |
System identifier - this value will be sent with every event and will be mapped to the source field in Splunk. Defaults to scc |
|
instance_id |
primary |
No |
Instance identifier - this value will be sent with every event. Used to distinguish different instances e.g primary and shadow in a HA configuration |
|
license_key |
|
Yes |
The license key for the PowerConnect Java agent to function |
|
splunk_hec_url |
|
Yes |
Splunk HEC url e.g. http://splunkhost:8088 |
|
splunk_hec_key |
|
Yes |
Splunk HEC token |
|
splunk_index |
sap |
No |
Splunk Index where the PowerConnect Java agent data will be sent |
|
splunk_hec_retry |
false |
No |
Enable retries for sending data to Splunk HEC |
|
splunk_hec_retry_count |
3 |
No |
Number of times to retry sending data to Splunk HEC |
|
splunk_hec_retry_interval |
10000 |
No |
Time to wait in milliseconds between Splunk HEC retries |
|
jmx_enabled |
true |
No |
Enable JMX metrics collection |
|
jmx_interval |
60000 |
No |
JMX metrics collection frequency in milliseconds |
|
jmx_mbeans |
java.lang:type=OperatingSystem;java.lang:type=Threading;java.lang:type=Memory;java.lang:type=ClassLoading;java.lang:type=Runtime |
No |
JMX Beans to collect separated by a semi colon. By default the agent will collect OS, Thread , Heap, Classloading and Runtime metrics |
|
thread_monitoring_enabled |
false |
No |
Enable thread state and stack trace collection |
|
thread_monitoring_interval |
60000 |
No |
Thread state collection frequency in milliseconds |
|
disk_monitoring_enabled |
false |
No |
Enable disk metrics collection |
|
disk_monitoring_interval |
60000 |
No |
Disk metrics collection frequency in milliseconds |
|
network_monitoring_enabled |
false |
No |
Enable network metrics collection |
|
network_monitoring_interval |
60000 |
No |
Network metrics collection frequency in milliseconds |
|
ljstrace_monitoring_enabled |
false |
No |
Enable ljstrace log collection |
|
ljstrace_monitoring_directory |
./log |
No |
Directory where ljstrace logs are being written |
|
ljstrace_monitoring_header |
time,severity,logger,thread,connection_id,text |
No |
ljstrace log header |
|
ljstrace_monitoring_filefilter |
ljs_trace.log |
No |
lsjstrace log filename pattern |
|
httpaccess_monitoring_enabled |
false |
No |
Enable http access log collection |
|
httpaccess_monitoring_directory |
./log |
No |
Directory where http access logs are being written |
|
httpaccess_monitoring_header |
ip,thread_name,user,timestamp,request_uri,status,bytes_sent,response_time |
No |
http access log header |
|
httpaccess_monitoring_filefilter |
localhost_http_access_.* |
No |
http acces log filename pattern |
Example configuration file
The following configuration file enables jmx, ljstrace log and http access log monitoring.
Note - all values must be surrounded in double quotes
powerconnect.properties
sap_system_name="CC1"
instance_id="primary"
license_key="xxx"
splunk_hec_url="http://localhost:8088"
splunk_hec_key="123-456-789"
jmx_enabled="true"
ljstrace_monitoring_enabled="true"
httpaccess_monitoring_enabled="true"
Linux
To configure the PowerConnect Java Cloud Connector agent on a Linux environment perform the following steps:
-
Login to the target server as the user who runs the SAP Cloud Connector software
-
Create a configuration file for the PowerConnect Java agent e.g.
touch /opt/powerconnect/powerconnect.properties -
Add the license key and Splunk HEC details to the configuration file and enable any additional monitoring you require
-
When using the go.sh script to manage SAP Cloud Connector:
-
Set the SAP_JAVA_OPTS environment variable to include the Java Agent flag and point it to the location of the PowerConnect Java package and configuration file e.g.
export SAP_JAVA_OPTS=-javaagent:/opt/powerconnect/powerconnect-java-cloud-connector.jar=/opt/powerconnect/powerconnect.properties
This variable can also be added to the SAP Cloud Connector user’s profile so it is set automatically -
Stop SAP Cloud Connector
-
Start SAP Cloud Connector
./go.sh
-
-
When using systemd or System V to manage SAP Cloud Connector:
-
Create or update the extension file scc_daemon_extension.sh in /opt/sap/scc
-
Add the following line to the scc_daemon_extension.sh file making sure the paths to the agent and config file are correct:
export JAVA_TOOL_OPTIONS="-javaagent:/opt/powerconnect/powerconnect-java-cloud-connector.jar=/opt/powerconnect/powerconnect.properties" -
Re-install the daemon so the changes are updated and survive upgrades:
-
For System V init distributions:
/opt/sap/scc/daemon.sh reinstall -
For systemd distributions:
/opt/sap/scc/daemon.sh reinstallSystemd
-
-
Restart SAP Cloud Connector
-
For System V init distributions:
service scc_daemon restart -
For systemd distributions:
systemctl restart scc_daemon
-
-
-
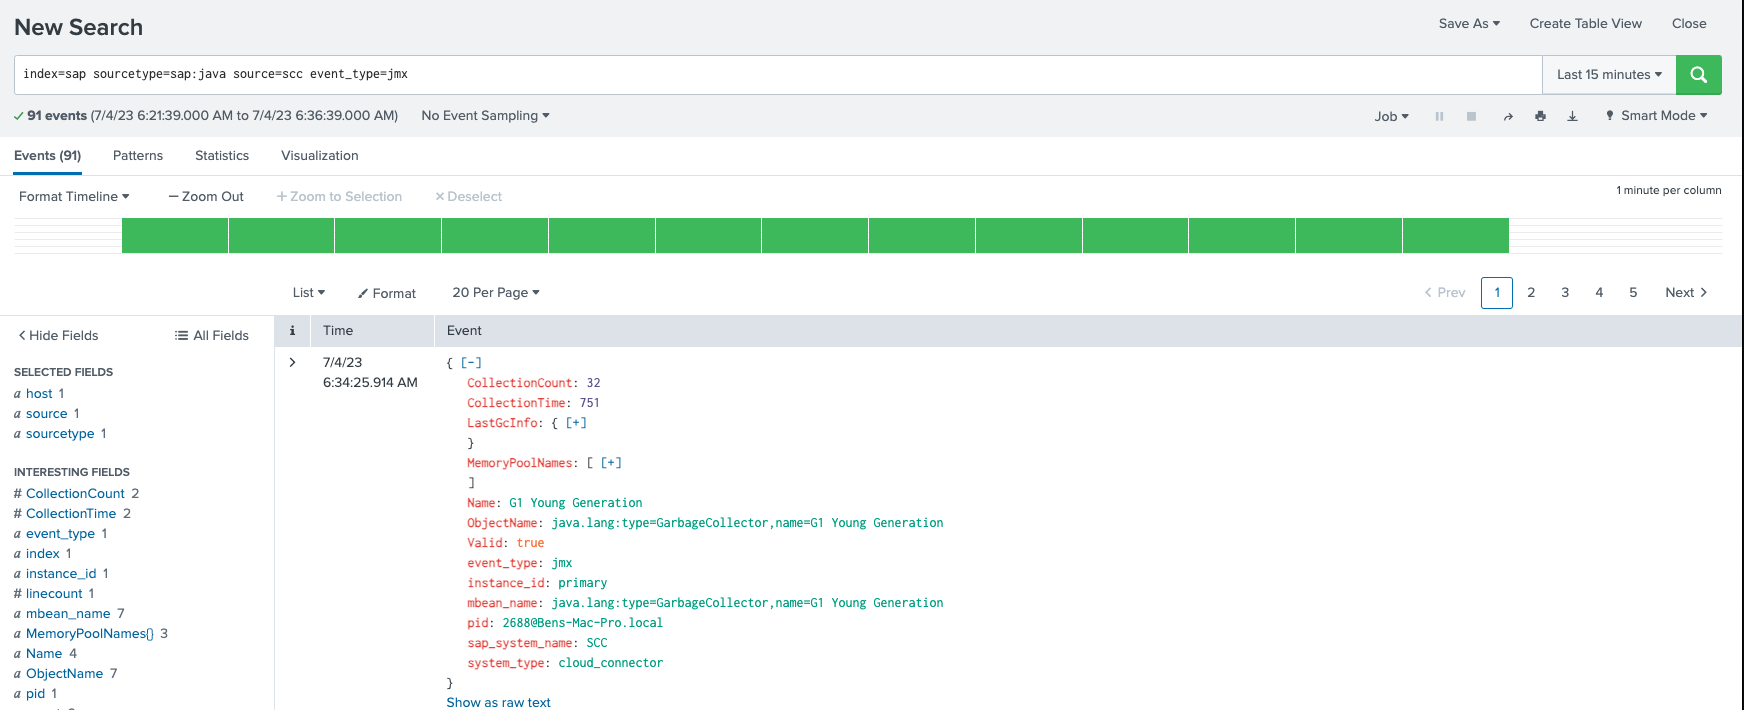
In the log directory you should see sap_powerconnect_java.log has been created
-
In Splunk you should now see SAP Cloud Connector events
Windows
To configure the PowerConnect Java Cloud Connector agent on a Windows environment perform the following steps:
-
Login to the target server as the user who runs the SAP Cloud Connector software
-
Create a configuration file for the PowerConnect Java agent e.g.
e:\powerconnect\powerconnect.properties -
Add the license key and Splunk HEC details to the configuration file and enable any additional monitoring you require
-
If you use go.bat to start Cloud Connector do the following
-
Open the Command Prompt
-
Set the SAP_JAVA_OPTS environment variable to include the Java Agent flag and point it to the location of the PowerConnect Java package and configuration file e.g.
set SAP_JAVA_OPTS=-javaagent:e:\powerconnect\powerconnect-java-cloud-connector.jar=e:\powerconnect\powerconnect.properties
This variable can also be added to the SAP Cloud Connector user’s profile so it is set automatically -
Stop SAP Cloud Connector
-
Start SAP Cloud Connector
go.bat
-
-
If you start or stop SAP Cloud Connector as a Windows Service do the following
-
Browse to the Cloud Connector installation folder
-
Edit the file props.ini in notepad or similar editor
-
Set the -javaagent flag to include the location of the PowerConnect Java package and the configuration file e.g
-javaagent:e:\powerconnect\powerconnect-java-cloud-connector.jar=e:\powerconnect\powerconnect.properties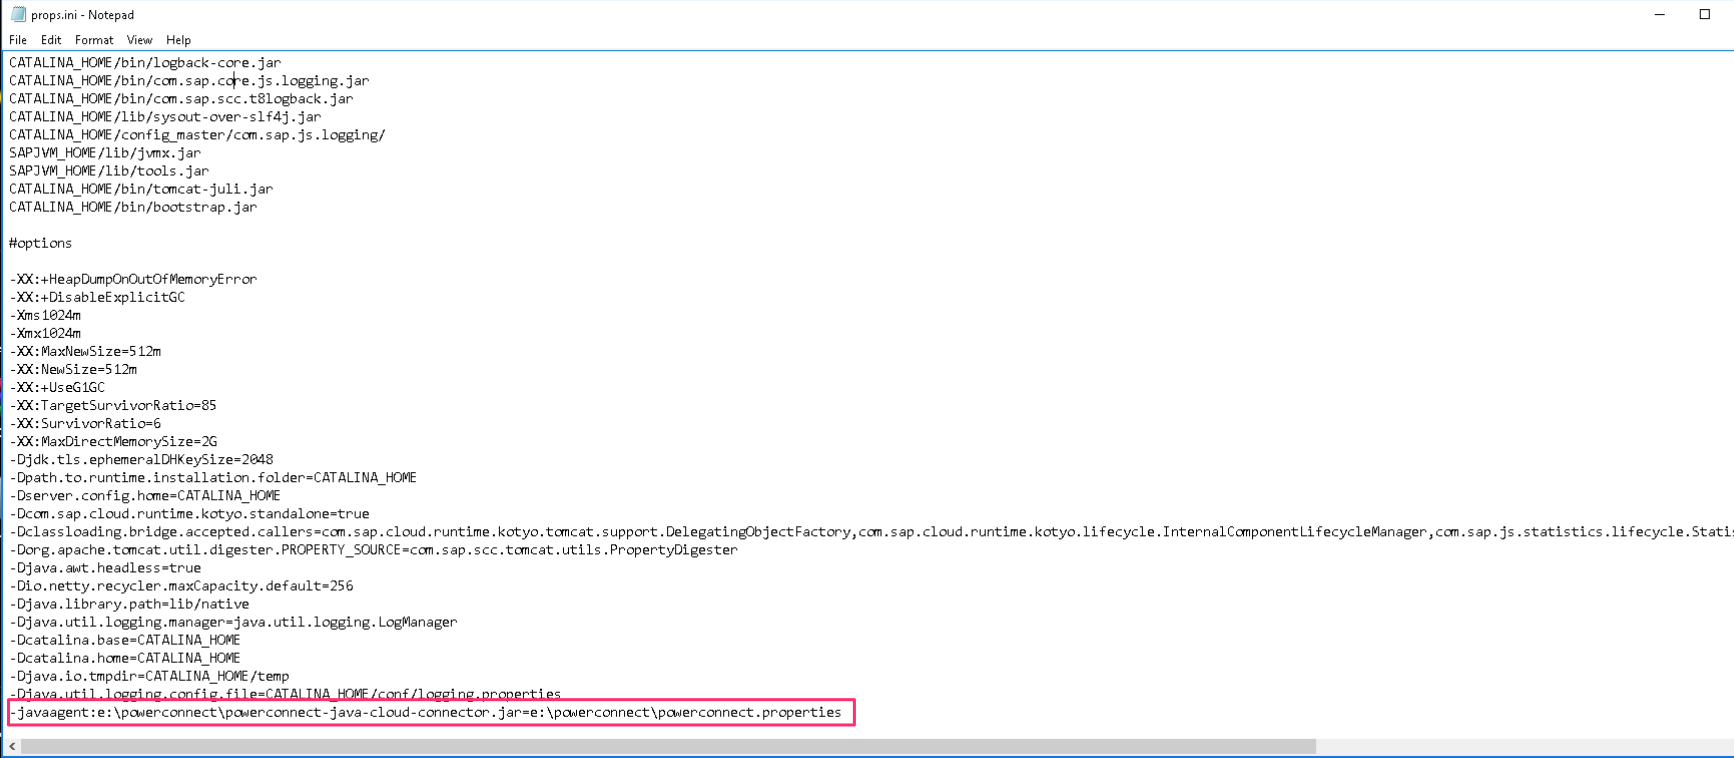
-
Restart the Cloud Connector service
-
-
In the Cloud Connector log directory you should see sap_powerconnect_java.log has been created
-
In your target plaform you should now see SAP Cloud Connector events e.g.